UI Series:
Getting Started with Octane for C4D
Getting Started with Octane for C4D
Version 2.0, Updated Feb 2024 using using Octane 2023.1.2 and Cinema 4D 2024.2
About This Guide
If you’re a Cinema 4D user and brand new to Octane, this is the guide for you. It replaces a previous version and has been completely overhauled for accuracy, readability, and generally a better experience.
Part I shows how to download and install the plugin for Cinema 4D.
Part II is a walkthrough of the most common things used in Octane (lights, cameras, materials) and the basics of how they work. Scene assets are available so you can follow along.
This guide is part of a series that explores every aspect of Octane in depth. There’s a LOT, and it will take time to get your head around all the concepts.
A guide for all the guides is located here. Once you’re done with this one, that will give you a recommended path forward to learn all the various parts of the engine.
PDF
Downloads
Part I: Intro and Installation
What is Octane Render?
Octane Render is a physically-based render engine made by Otoy. It’s available as a standalone product (appropriately called Octane Standalone) and also as a plug-in for several DCC (Digital Content Creation) host apps like Maya, 3D Studio MAX, and Cinema 4D.
In this guide, we’re going to focus on Octane as a plugin for Cinema 4D. This guide was written using Octane 2023.1.3, but it's basic enough that it should work fine with pretty much any subscription version to come out in recent years.
Within C4D, Octane provides a render viewport window (called the Live Viewer), a full material system that can be edited in the Material Editor (like you’re used to) or in the Node Editor (which you should definitely learn how to use), tags that augment C4D’s native camera, lights, and environments, and then a few other objects that offload processor-intensive tasks directly to the GPU.
How to download and install Octane Render for C4D
Go to otoy.com and click the downloads link in the red navbar at the top. From there it will have you sign in to your account if you aren’t already, and then take you to the downloads page.
This has been vastly simplified recently - just head down to the plugin you want for the OS that you have (Mac or Windows) and get the latest stable version. You don’t need to download Octane Standalone unless you want to play with that separately.
Once you check Accept and hit Download, you’ll get a ZIP file (Mac) or a RAR file (Windows). You’ll need some sort of unarchiving utility like 7zip to decompress the RAR file.
On the Mac, you’ll have a folder that says the current version of the plugin. On Windows, you’ll have a folder that says c4doctane. In both of those, there are several files.
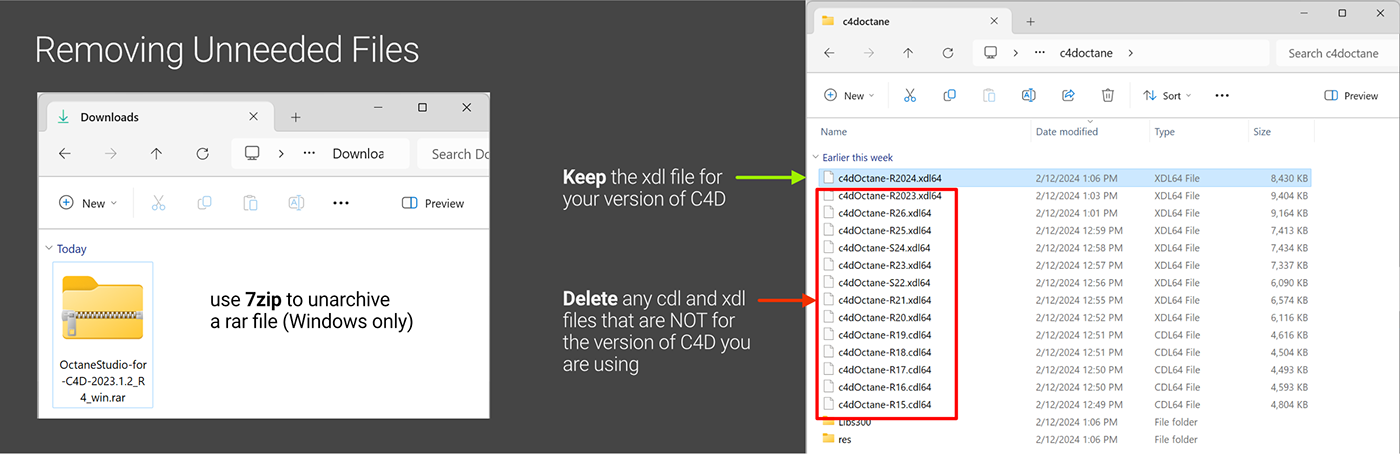
This is important
You need to delete the .xlib files (Mac) or .xdl64 files (Windows) for the versions of the software you are not using. Say you have C4D R2024. You will need to delete the R15, R16, R17...cdl and xdl (or xlib on Mac) files for everything except c4dOctane-R2024.xld64 or c4doctane-R2024.xlib prior to installing.
If you have several versions of c4d, you’ll need to make several copies of the folder and only leave in the right version for each plugin folder. Probably best to do this process one version at a time to avoid confusion.

Next up, open C4D, go to Edit>Preferences, and in the bottom left, click the Open Preferences Folder... button to reveal the preferences location in Windows Explorer or Mac’s Finder.
find the Plugins folder, and move the c4doctane (Windows) or C4D-OctaneX-(blah blah version number for Mac) into the plugins folder, then restart Cinema 4D.
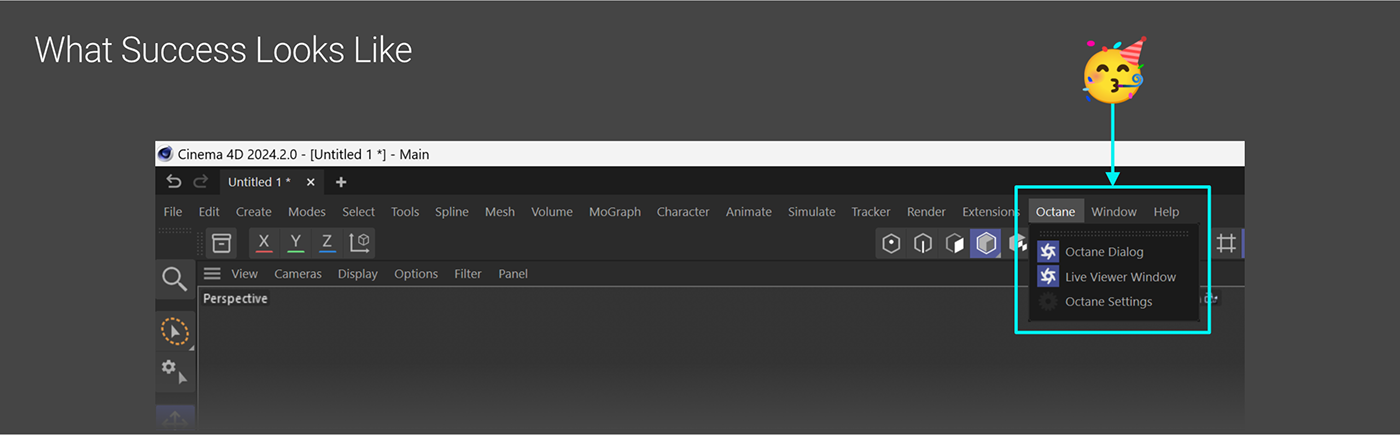
If all goes well, you should be prompted to log in to Otoy’s server with your Otoy account credentials when you launch C4D again, and then you’ll see an Octane menu at the top of the C4D interface. Once it’s activated, we’re off to the races.
Part II: Walkthrough
Pretty much everything we want to do in Octane is located in the “Live Viewer” window, which we can access in the Octane menu at the top of the C4D interface.
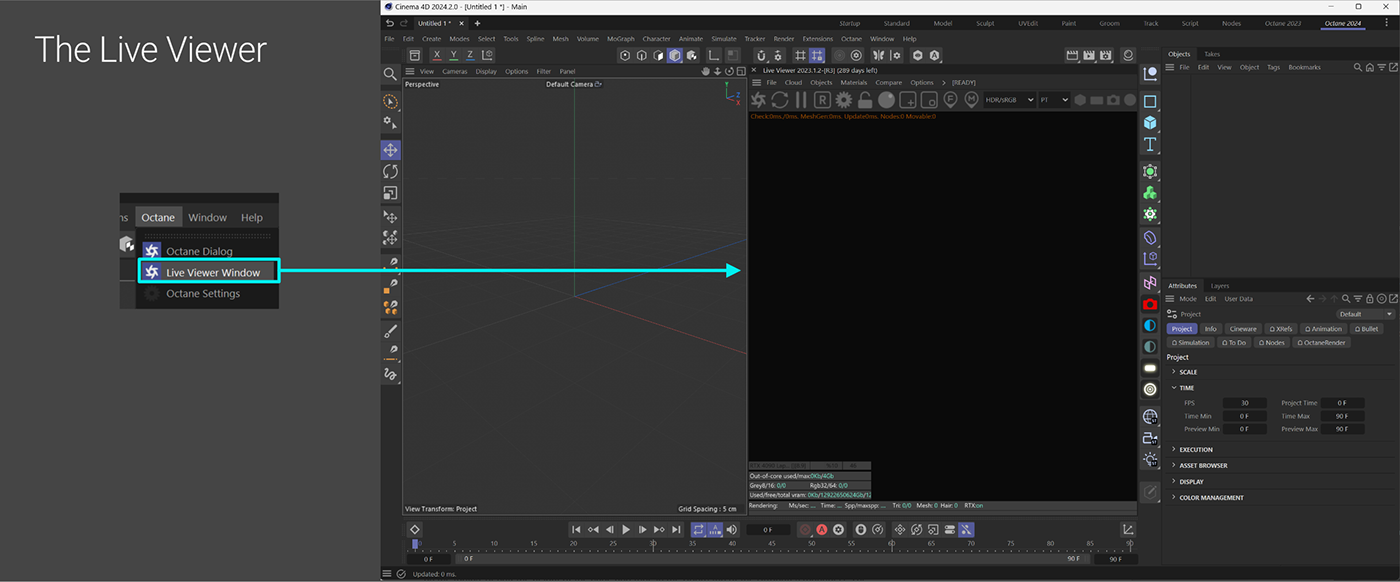
The Live Viewer works similarly to the other viewports in C4D. We can navigate around in it using alt-left click/middle click/right-click, drop materials on items directly in it, and do some more advanced things like pick focus. There’s a menu bar at the top which is where all of Octane’s objects and materials and stuff live, a button bar below that which we can use to start/stop the render and various other quick UI things we’ll need access to, the main area where the render shows up, and some information overlays.
We’ll be using this a lot, so we’ll want to dock it in the interface somewhere.
Starter File
The follow-along files are located here. Make sure to download all the files and the accompanying /tex folder. When we open 001 Example Scene - START.c4d we’ll see a basic scene made up of a bunch of objects that form a sculpture that sits on a table that’s on top of a backdrop. These are all built-in C4D primitive objects with the exception of the Sculpt Bust which is in C4D’s Asset Library.
As with most engines striving for realism, Octane works best when objects are at real-world scale. This is an important concept to drill into our heads, especially early on as we’re learning. A model of an average person should be somewhere in the 5-6’ height range (150-180cm or so). A billiard ball should be about 2” in diameter (~6cm).
The C4D default objects are relatively large - the stock cube is 200cm to a side, or about 6’5, which is fine for the start of a piece of furniture, but definitely should be scaled way down if we want to make a sugar cube out of it. The light bounces, camera interaction and texture sizes will just look more realistic this way. It’s also a no-brainer when we’re trying to scale objects to one another - we can just Google “billiard ball diameter” and then “billiard table size” and enter those values rather than wing it and hope we’re right.

Ready for our first Octane render? Let’s hit the Send Scene button (looks like an Octane logo) toward the top of the Live Viewer. This packages the scene up and sends it to the GPU to start rendering. The green progress bar at the bottom tells us how long it will be until the render is complete.
Immediately this looks a lot better than a standard render, and on most GPUs, it’s really, really fast. If we start moving around in the scene, we’ll see that the viewport constantly updates to match. The button two over from Send Scene is Pause. That stops rendering and picks it back up when we hit it again.
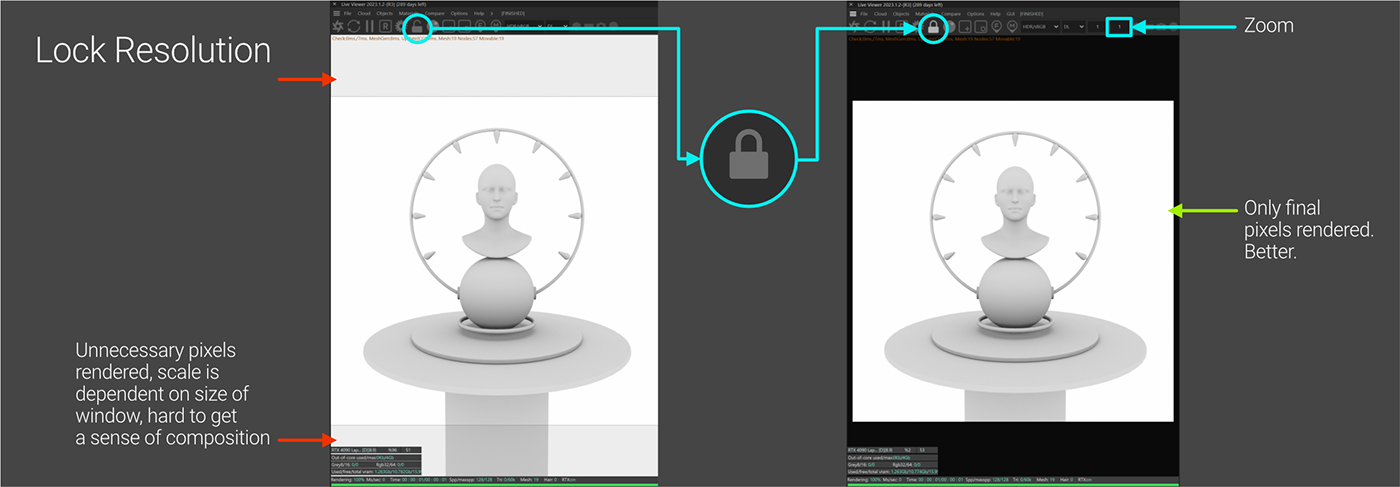
The Lock Resolution button is very important. This makes it so the Live Viewer only renders the pixels in our final frame at the final resolution. When it’s off, the scene scales to the size of the viewport window and renders everything in the window, even stuff that won’t be in the final export. This makes it difficult to get a sense of the composition and what the final render will look like.
By locking the resolution, we force the Live Viewer to show us the render at full size, even if it’s cut off when the window is too small. To see the whole thing, we can use the zoom field (the one on the right, defaults to 1) to manually fit the scene to the window (try 0.5). We can then set it back to 1 and left-click drag in the window to pan around, or undock the window to see at 1:1 prior to doing our final render.
Now that the render is done, we can go to the File menu in the Live Viewer and choose “Save image as...” and save it as a PNG. That’s about as basic as it gets. Ready to make it look better?
Lighting
Octane has three ways to light a scene: Environmental lighting, physical lights, and materials that we can put on our objects that turn them into light sources. We’ll get to emissive materials in the next section.
Environment
Octane needs an environment to render anything.
It has a default environment that’s basically the equivalent of the inside of a giant illuminated off-white sphere (90% white). If we go into the Octane Settings (Gear button in the Live Viewer), choose Settings and Env., we can see the default environment, and change the color if we want.

Octane also has Environment objects that we can drop into a scene. Let’s give this a try by going to the Objects menu in the Live Viewer and choosing Texture Environment. Pretty much nothing changes. “Pretty much” and not “exactly” because the Texture Environment’s default color is 90.6332% white, not 90% even like the default. To our eyes though, it doesn’t really matter.

What we get is a standard C4D Sky object that has an Octane Environment Tag on it. This is how most things in Octane work - they build on the standard C4D components and then add Octane-specific settings using tags. Why reinvent the wheel, right?
Important: All of the environment settings are in the tag, not in the Sky object itself.
Octane Environments currently come in three flavors. Texture, HDRI, and UVW Transform. All three of these are the same thing, just set up with different defaults. We’re going to ignore UVW for now.
Texture Environment

The texture environment that we created defaults to having a solid color (called “RGB Spectrum” in Octanespeak) driving it. We can change the color by clicking the white square and picking a different color. This isn’t just limited to a color texture, though. We can also feed in any other procedurally generated texture Octane can make (like the gradient above) for some interesting effects.
HDRI Environment
While the texture environment can provide some fun non-photoreal looks, the HDRI Environment maps an image on the inside of the giant sphere and uses that as a light. Since this often uses a photo from a real-world environment, it creates both natural-looking lighting in the scene and reflections in our objects.

Poly Haven is a fantastic source for completely free, CC0 HDRI images. For the most part, we only need 4K versions. If we need to save on VRAM, we can use 2K or even 1K versions. We should only consider 8K+ if we’re using it as a backdrop for our scene and need it to be super clear at the expense of speed. The resolution of an HDRI doesn’t affect how much of the image is seen, only how sharp it appears.
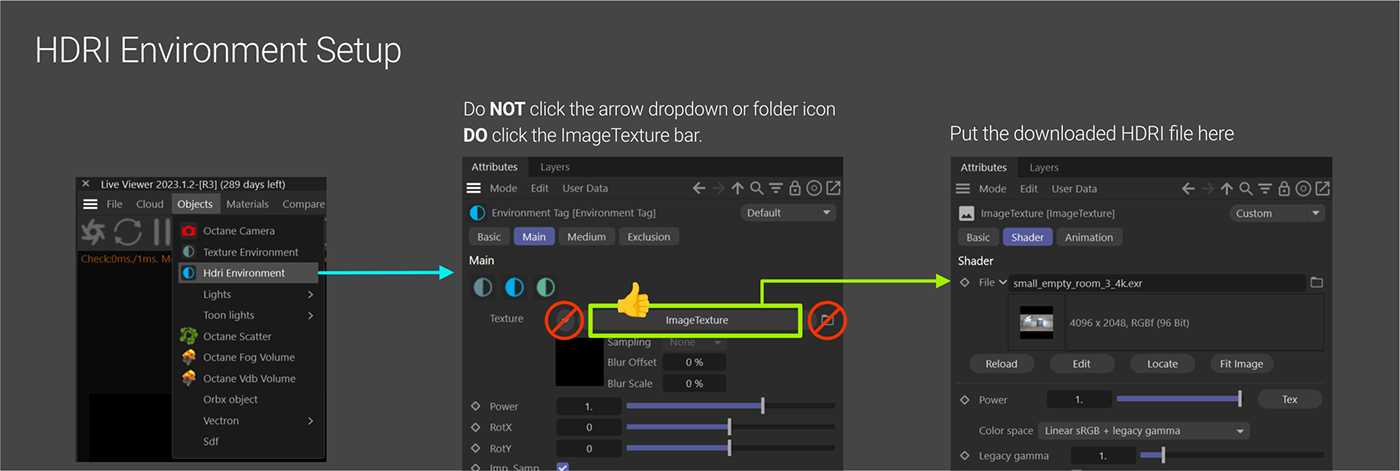
Super super important: When putting an HDRI in a scene, we need to be sure to click the long Image Texture button in the Environment Tag’s settings and NOT either the dropdown or folder icon which will replace the Image Texture node completely. HDRIs (or any images) must be housed at the Image Texture level in order to work properly and not blow out or cause other wonky effects.
Let’s grab the small empty room 3 HDRI and put it in the Image Texture area in an HDRI environment. This can get a little confusing because we’re working on two levels, but we really just want the image loaded in at the Image Texture level, and then do all our manipulation up one level in the tag’s attributes.
Power will make the whole scene’s lighting more or less intense. HDRIs can be rotated with Rot.X and Rot.Y. Rotating the C4D Sky object won’t do anything like it does in other render engines - all rotation needs to be done within the tag.
Let’s grab the Rot.X slider and move it around a bit to see how that affects the lighting in the scene. When we’re done playing, let’s set it to -0.13 (rotating just a little bit can greatly impact the lighting).

The last thing we’ll look at here is swapping out the visible background. Oftentimes we won’t want to see the HDRI itself, just the effects of the lighting. We can either do this by putting something in the background that blocks it, or set up a second environment as a visible one.
This can be done by dropping in a second environment (usually texture, but it can be another HDRI too), and setting its Type to Visible environment. Now the render will take on the lighting from the Primary environment (HDRI) and the background from the Visible (texture) environment.
Let’s delete all the environment objects we were using and light the scene in another way.
Physical Lights
Physical lights are maneuverable lighting panels that we can place in our scene to very specifically dial in the lighting. The main physical lights used in Octane are Area Lights, which are default C4D Area Light objects with Octane Light Tags on them.
Like environment objects, most of the attributes that Octane will use like the power, distribution, etc. are in the tag, not the C4D light object. There are still a few settings in the C4D object like the physical size and coordinates, but we always want to check the tag first for light properties.

The Targeted Area Light is an Octane Area Light with a C4D Target tag on it. This is really useful for aiming lights - if we drop in a null, select it, and then we go and add a Targeted Area Light, it will hook up the Target tag to the null and now the light will aim wherever we place the null.
Let’s try this out. First we’ll want to delete any lights and environments we put in already, then create a null, call it “Light Target” (doesn’t have to be called that, it just makes it easier to find in the scene and we don’t accidentally delete it later when we’re thinking “what’s this random null here?”). Since the bust will probably be the focus of the scene, let’s put the null up around 160 on Y so it’s in the middle of the head.
Now with the Light Target null selected, we can go into the Live Viewer’s Objects menu, under Lights, and pick Octane Targeted Area Light.
This drops the light smack in the middle of the scene and immediately points up at the target. We’ll notice something interesting here. There’s a big blacked out area. That’s because area lights in Octane are visible by default. The backs of them are matte black, which is what we’re currently seeing. We can hide the light in the Light Tag’s Visibility tab, or just swing it around until it’s out of frame. Let’s put it at P.X:100cm, P.Y:200cm, and P.Z: -50cm. That’s about 150cm from the head and it’s no longer blocking anything in the scene.
Obviously we still have some problems here. First off, there’s only one light in the scene, but it still seems like light is coming from everywhere and illuminating all sides of our sculpture. That’s because it is. As mentioned before, Octane needs an environment to render anything. Since we deleted the environments we were messing with earlier, it went back to the default one which is an evenly-lit 90% white globe. So not only are we getting a ton of light from our panel, but we’re also getting the light from the environment. Time to fix that.

We’ll see this come up a lot, especially in materials. The color black often means 0, or no contribution. If we set the default environment to black, it’s not like we’re painting the walls black, it means we’re turning the environment light off.
So now the only light source in the scene is the targeted area light. Great. Still a bit blown out though. The reason for this is that C4D’s default area light is HUGE. It’s 200cm x 200cm, which is taller than the average person. In the real world, the larger the emitting surface, the more light it throws out, especially with a high power value (100). The other factor is that light has a natural falloff in the real world, so the closer it is, the brighter it is. This big light is right up on our model, so it’s going to overpower the scene.

We have some options for how to deal with this, as we can see above. We can reduce the power of the light, make it smaller, or move it further away (or some combo of the three). Each method gives different results. Reducing the power but keeping the light large brings out the detail and softens the shadows. Reducing the size makes the shadows sharper and more contrasty, and only illuminates a small portion (we’re completely losing the base here to shadow). Moving it further away is kind of a middle ground - it lights up the whole model including the base like reducing the power, but the shadows are sharp like when we made the light smaller.
Let’s unhide the backdrop and get a nice 3-point studio light setup going:
Key Light: P.X: 160, P.Y: 200, P.Z: -85, size: 100x100cm, power: 20
Fill Light: P.X: -200, P.Y: 170, P.Z: -50, size: 160x160cm, power: 2
Top Light: P.X: 0, P.Y: 270, P.Z: 64, size: 60x60cm, power: 5
Materials
The Octane material system, unlike lights and environments, is fully separate from C4D’s material system. While the materials themselves aren’t based on C4D material types, we can still use C4D’s Material Editor to edit them. In the future we’ll probably want to switch to the node editor, but that’s a whole other topic.
Color Picker
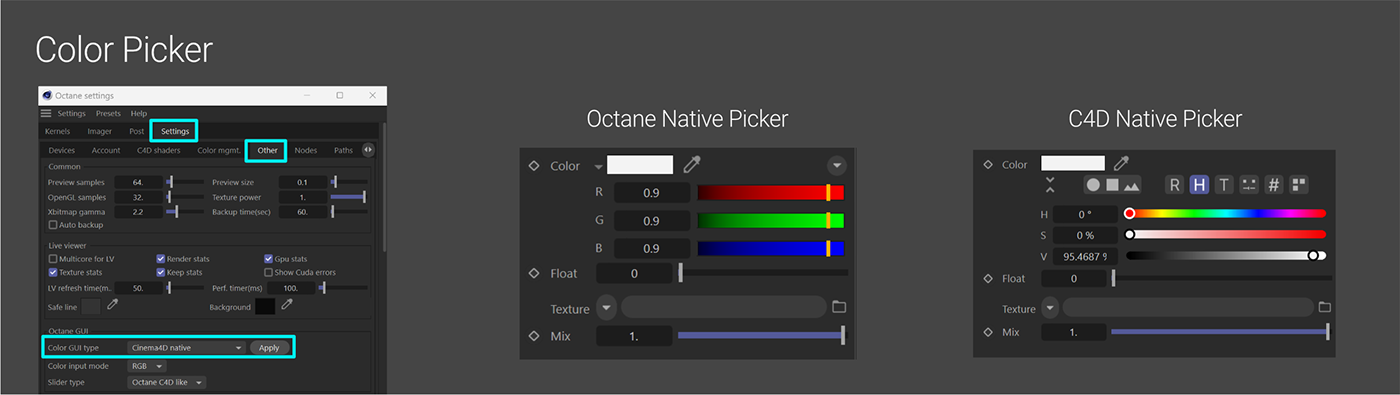
Before we get started, we’re probably going to want to change the color picker. Octane’s default color picker is Linear RGB, which is not typically what we’re used to as artists. In the Octane Settings, in the Settings tab, in the Other subtab, there’s an option for Color GUI type - let’s set this to Cinema 4D Native.
Creating a Universal Material

Materials have their own menu in the Live Viewer. The Create submenu is where all the material types are stored (yeah, there’s a lot). The Universal Material is the most versatile material type, and will be good for 90+% of the materials we’d want to make, so let’s drop one in.
If we apply this new material to the sphere in our scene, we’ll notice it gets really shiny. The default material on C4D objects with no material is a matte almost-white surface. The default Universal material is a glossy almost-white surface. Let’s double-click it to pop up the Material Editor.
In the Basic tab, we’ll see a button for the Node Editor which we’re going to ignore in this guide, but is the preferred method for building more complex materials. Under that are all the channels.

Materials work in a layered fashion. At the base layer there’s the Albedo, which is also called Base Color or just Color in other material systems. If we click the Albedo tab and then change the color, we’ll see the sphere go from a shiny almost-white plastic to whatever color we pick (orange in this case).
Specular and Metallic both control the reflective properties of a material. These are controlled with a 0-1 Float slider (0 is 0, 1 is 100%, so 50% would be 0.5, 75% would be 0.75, etc.).
The Metallic channel overrides the Specular one and makes a material look more metallic. If we set that to 1, we get a super shiny metal. It blacks out a bunch of our sphere because our environment is black, so there’s nothing to reflect. We can fix that by adding our empty room HDRI from before and setting the power to 0.5 so it doesn’t overpower most of the nice lighting we got from our area lights.
Other channels build on or interact with each other to make up the material. There are whole guides dedicated to this, so we won’t go much more into it here.
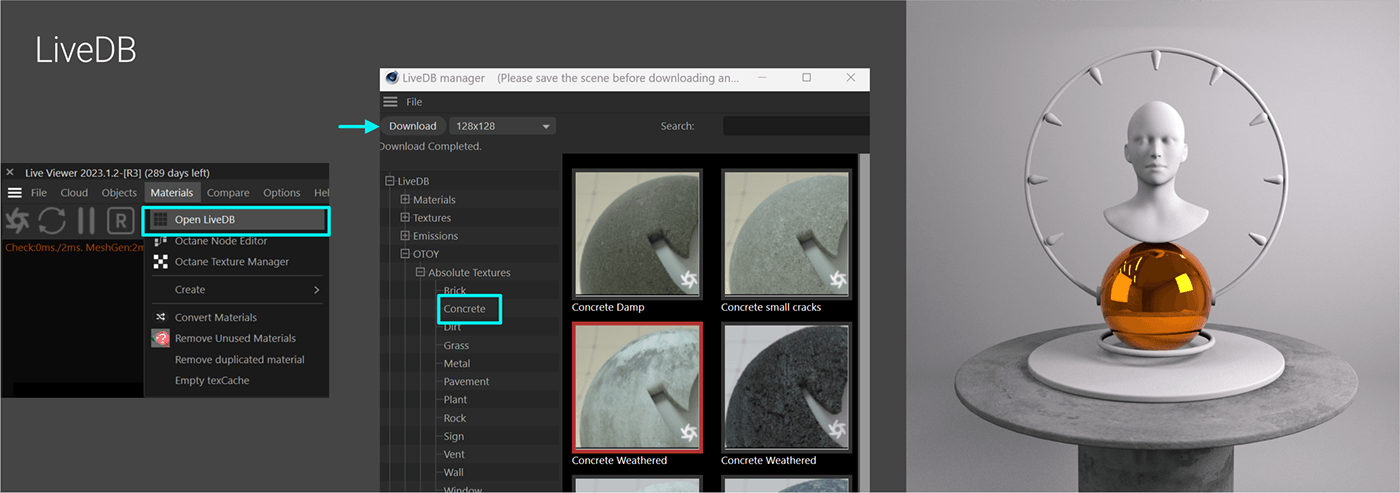
The LiveDB is an online database of materials created and distributed by Otoy that we can use in our scene. This is located under the Materials menu at the top.
Let’s navigate to LiveDB>OTOY>Absolute Textures>Concrete and grab Concrete Weathered (the light one) by clicking it and clicking Download (after saving our scene). While we’re in here, we can scroll down to the Starter Set of materials and download 0202 Gold-Artistic (Metallic), and 0303 Incandescent BB (Emissive). If we apply the concrete material to the table, it’ll look like concrete.
We need to take a quick detour to look at settings, but we’ll get back to the materials after that.
Kernels
Octane is fairly unique among render engines when it comes to the settings. Most engines that we’ve likely encountered have had one set of settings, and that’s it. Octane has developed four chunks of rendering code over time called kernels, each with their own settings, advantages and disadvantages. Materials and lights will react differently (and cause varying render times and looks) depending on the kernel we choose.
By default, Octane starts with the Direct Light kernel (DL). This is super fast, but also limited in the realism department. The other kernel we’re going to look at in this guide is Path Tracing (PT). Path Tracing is more accurate, more time consuming, more prone to noise, and is less forgiving with bad light or material settings. BUT, it often looks SO much better, and we can work around all these other issues.
Path Tracing Kernel
Let’s make a new dark matte Universal Material for the backdrop. We want to change Albedo to H:0, S:0, V:25%. The Float slider in Specular should be set to zero. This goes on the backdrop.
Next up, let’s remove the orange material from the sphere and concrete from the table and put the 0202 Gold - Artistic material on the top Geo Null so the whole sculpture turns gold. Once again, we see a bunch of portions black out, and it generally doesn’t look good. This time, though, it isn’t a problem with the environment not reflecting in the metal. It’s a problem with other reflective things reflecting their reflections in the reflections.
This is something we can fix in the DL kernel, but the Path Tracing kernel is already set up by default to handle situations like that, so let’s switch to it.

To do this, we need to go to the Octane Settings, then click the gray bar at the top that says “Direct Lighting”, and choose “Path Tracing” instead. By default, Octane in C4D starts with 16,000 samples which is way too many. For general lookdev stuff like we’re doing now, we only need this to be at 256.
Suddenly a lot more of the scene resolves in the reflections which is great. We might see a bit of a speed hit and some noise, but best practice here is to get as much realism out of the scene as possible while developing (even if we have to live with some noise), and then dial in the settings at the end to clean up and speed up the whole thing.
Let’s get back to the materials now, and put the 0303 Incandescent BB material we got from the LiveDB on the Cone Cloner and Halo. This turns them kind of an orangey yellow, but doesn’t really read as light so much. This where a bit of post processing can help. If we go into the Octane Settings, in the Post Tab, in the Image Processing subtab, we can enable Bloom!
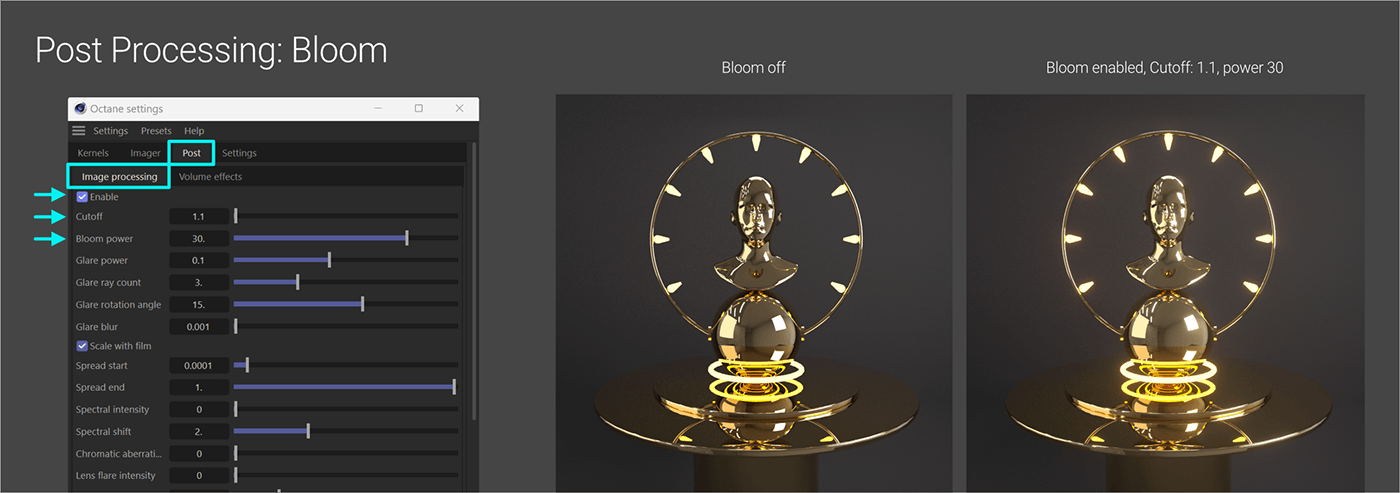
These settings will vary wildly with every scene and the artist’s taste, but the effect makes illuminated things in the scene seem like they’re actually illuminated by giving them a glow. For our scene, 1.1 Cutoff and 30 power will get us a fairly subtle yet effective look.

Let’s get a final set of materials in. The ones above were gathered mostly from the LiveDB, but the background was created from scratch. Modifications on any of the materials are noted as well.
The final set is also located in the files we downloaded (004 Example Scene - Materials.c4d).
Materials alter the whole scene. Some are harder to render than others and will produce noise until enough samples are used to get rid of it. Others will lighten and darken everything just by way of scattering light about or absorbing it.
In this scene, roughening up the bust a little helped make it more defined and less harsh. The glass from the LiveDB doesn’t have a high-polished shine to it, so adding the specular contribution back (setting it to 1) gave us that glossy look at the expense of some noise.
There are always tradeoffs, and we always need to be thoughtful about material choices and decide whether what we’re getting out of modifying or swapping one is worth it.
Tone Mapping

After getting our final material set in, there are some problem areas, notably in the really hot reflections. The lights are physically plausible, but color management – specifically tone mapping – is getting in our way. Tone mapping is one of those things that affects everything, but is not very widely understood. It can really make or break a render. We’ll learn more about this in other guides dedicated to the topic.
As we can see in the detailed areas above, there are some ugly spots in the copper with kind of an orange fringe followed by a blown highlight. There’s also a particularly bad area around the bottom of the sphere where all the highlights just glob together.
If we go to the Octane Settings, in the Imager Tab and Imager subtab, there’s a one-click solution to get ACES tone mapping. All we have to do is check this (while the render is running), and just like magic, the falloff between the hot spots and the darker areas are much nicer and no longer look like they were shot with a phone camera from 2007.
Not all our problems have been solved though - ACES’ tone mapping curve is pretty aggressive toward making things more contrasty, so the background went from dark gray to black, and our light materials dimmed back a bit, taking some of the bloom with it.
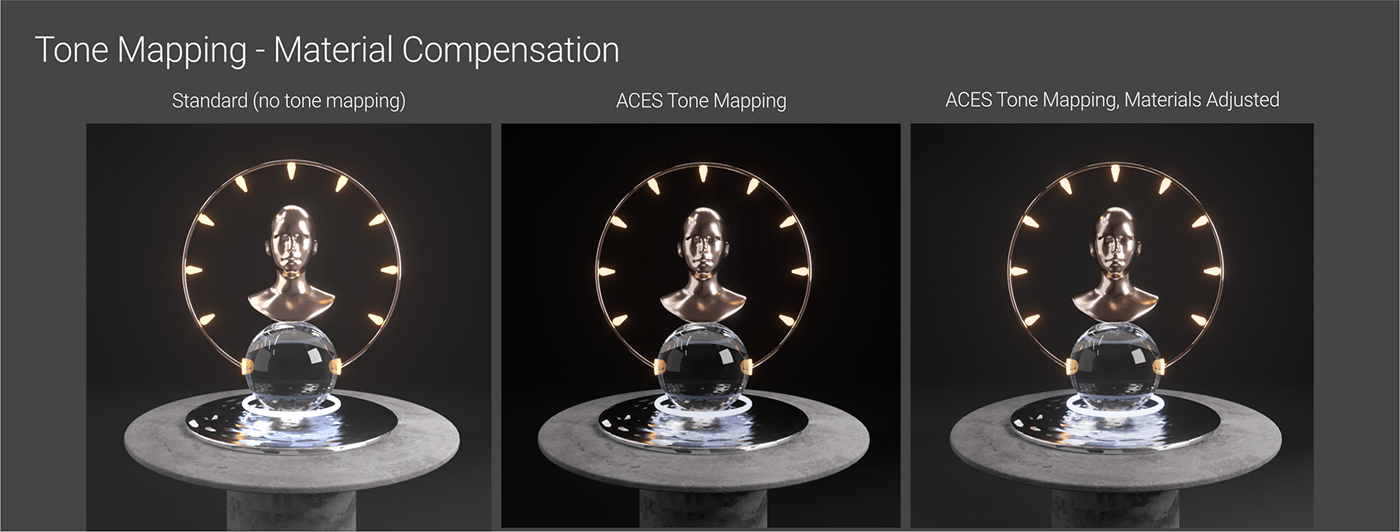
Fortunately, this is a much easier fix than blown highlights - we just have to make the background material lighter (V=40%) and the emissives a little hotter (Incandescent: 150 power, Cool Light: 100 power) to compensate. This is why it’s a good idea to choose the tone mapping early on in the process since it informs color decisions.
Camera
We’ve gone all this way without talking about cameras, so let’s remedy that. The Octane Camera is located in the Objects menu of the Live Viewer right at the top. Let’s make sure our Perspective Viewport is active and drop on in (if one of the other viewports like side or top view is active, the camera will match its perspective, become a Parallel camera, and hose everything).
We also want to make sure we hit the gray reticle icon just to the left of the Camera tag and turn it white so that we’re looking through it. This trips up beginners and experts alike.

Just like lights and environments, the Octane Camera object is a default Cinema 4D object with an Octane Camera Tag on it. Unlike the other objects, some of the important settings are actually in the original C4D object - this is where we set the focal length, the focus distance, and coordinates.
The Octane Camera Tag is where all the fancy stuff is like depth of field, motion blur, and can override the global settings for the Imager (where tone mapping is) and Post Processing (where Bloom/Glare is). Each camera can have their own settings for these things which is great if we’re expecting it, and not great if we’re sitting there cranking the bloom and nothing is happening because the settings were overridden.
In the C4D Camera Object (not the tag), let’s set the coordinates to P.X:0, P.Y:267, P.Z: -115, R.H:0, R.P:-45, R.B:0. This gives us an overhead shot. If we make the focal length 85mm in the Object tab (again, the C4D object’s Object tab, not the tag’s), that will give us a nice portrait lens.

Quirky UI: When we go into the Octane Camera Tag, we’ll see a tab for Thinlens (technical optics term, just go with it :) ). Under Physical Camera Parameters, we’ll see that it’s set to f/2.8 by default.
It’s really not though.
This is one of those things that we just have to know. If we want to set our lens to f/2.8, we need to nudge the slider one way or the other which will activate depth of field (DoF), and then manually set it back to 2.8. We’re going to set it to 1.2 so we get a nice shallow depth of field effect. If we want to turn DoF off, we’ll need to go into the Depth of Field settings and change the Aperture to zero.

When it comes to focusing, we have a few options. The easiest way to do it is use the focus picker (F map pin looking icon at the top of the Live Viewer). When this mode is active, wherever we click in the Live Viewer becomes the focus point. We’ll want to make sure we get out of this mode after we’re done.
We can also use a null or other object similar to how we set up our light target, only the C4D Camera Object already has that built in using the Focus Object field in the Object tab of the Camera, so no need for yet another tag.
The Octane Camera Tag also has a checkbox for Auto Focus in the Depth of Field section under the Thin Lens tab which may or may not work depending on the scene, but might be worth trying for animations.
Important: The Auto Focus setting must be turned OFF for the Focus Object field in the camera to work.
Depth of Field is tough on the GPU, which means our renders are going to be noisier than with it off using the same number of samples. We’re currently at 256 samples, and it’s a bit grainy. We have a few options to clean it up including throwing more samples at it, but this is an excellent candidate for denoising.
AI Denoiser

Here, all we have to do is go into the Octane Settings, go to the Imager Tab, AI Denoiser subtab, and click Enable Denoising, and then the next time we go to render, there are two little boxes at the bottom. One is Main (that’s before denoising) and the other is DeMain, which is Denoised Main - we need to click that to see the denoised result.
Once again, we can go to File>Save Image As… in the Live Viewer to save out a PNG.
Wrap Up
Hopefully this is enough to get you started on your Octane journey. There’s a LOT more to learn, and that’s what this guide project is all about. The next step will be having a look at the Octane Guide Study Path, which is essentially a guide to all the guides in this project. This will walk you through a recommended order in which to read the guides and understand certain topics one by one. Of course there’s no harm in jumping around, but certain things rely on concepts learned in earlier ones, so going in order has its advantages.
Happy Rendering!
Author Notes
OG011 UI Series: Getting Started with Octane Render version 2.0, Last modified Feb 2024.
Changes from v01: Full rewrite and updated images and downloads. Basically, everything.
This guide originally appeared on https://be.net/scottbenson and https://help.otoy.com/hc/en-us/articles/212549326-OctaneRender-for-CINEMA-4D-Cheatsheet
All rights reserved.
The written guide may be distributed freely and can be used for personal or professional training, but not modified or sold. The assets distributed within this guide are either generated specifically for this guide and released as cc0, or sourced from cc0 sites, so they may be used for any reason, personal or commercial.